March 2016: This project should soon be started with respect to the 50 yard range. Here is the latest PDF markup with dimensions. 3-11-2016 Jeff Chimileski, 50 Yard Range
The below info can be largely ignored, but I will leave it here for reference. At one point the discussion turned to having all the ranges done at once, but many of the board members were concerned it would cost too much at one time. If the board of directors can agree to spend more money now, then we are prepared with measurements to support seeking quotes to proceed with further drainage improvements to the 25 yard pistol ranges. If you have been to the ranges in the last few weeks (Mar 2016), then you know how soft the muddy road is, especially at the top of the hill.
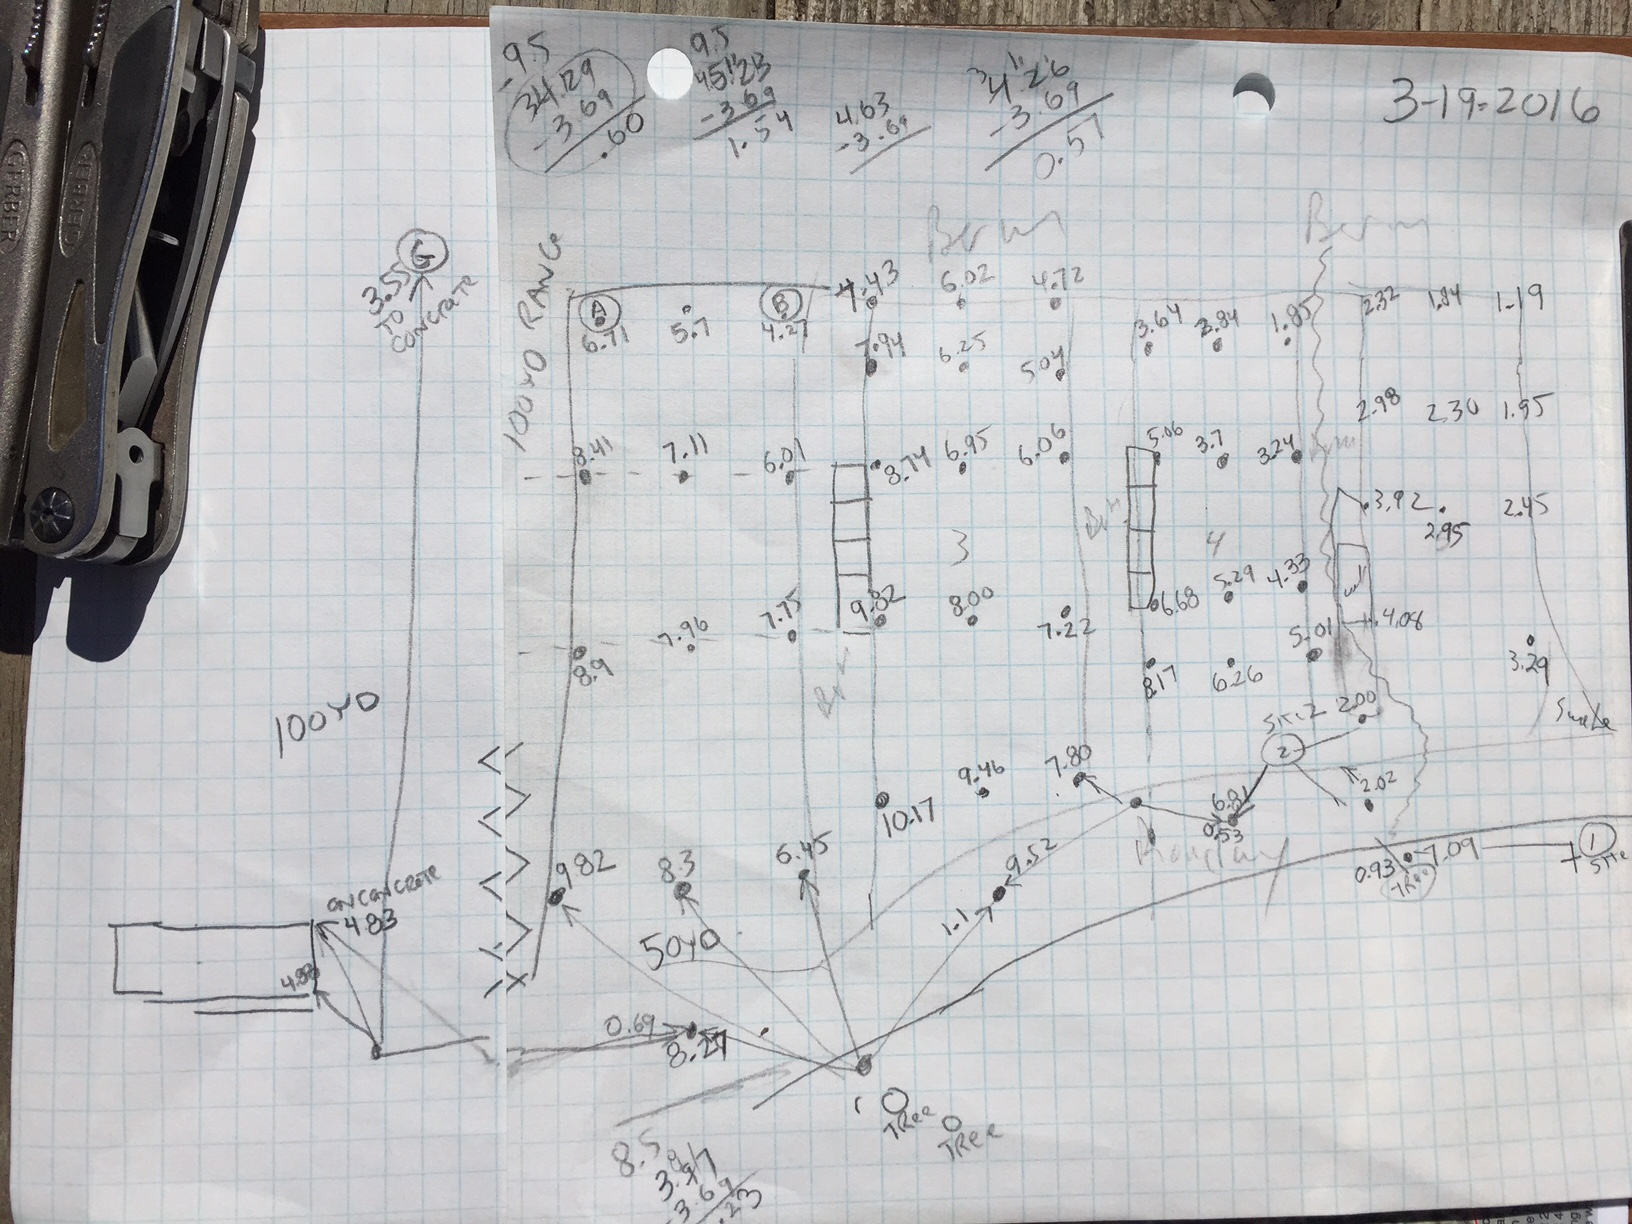
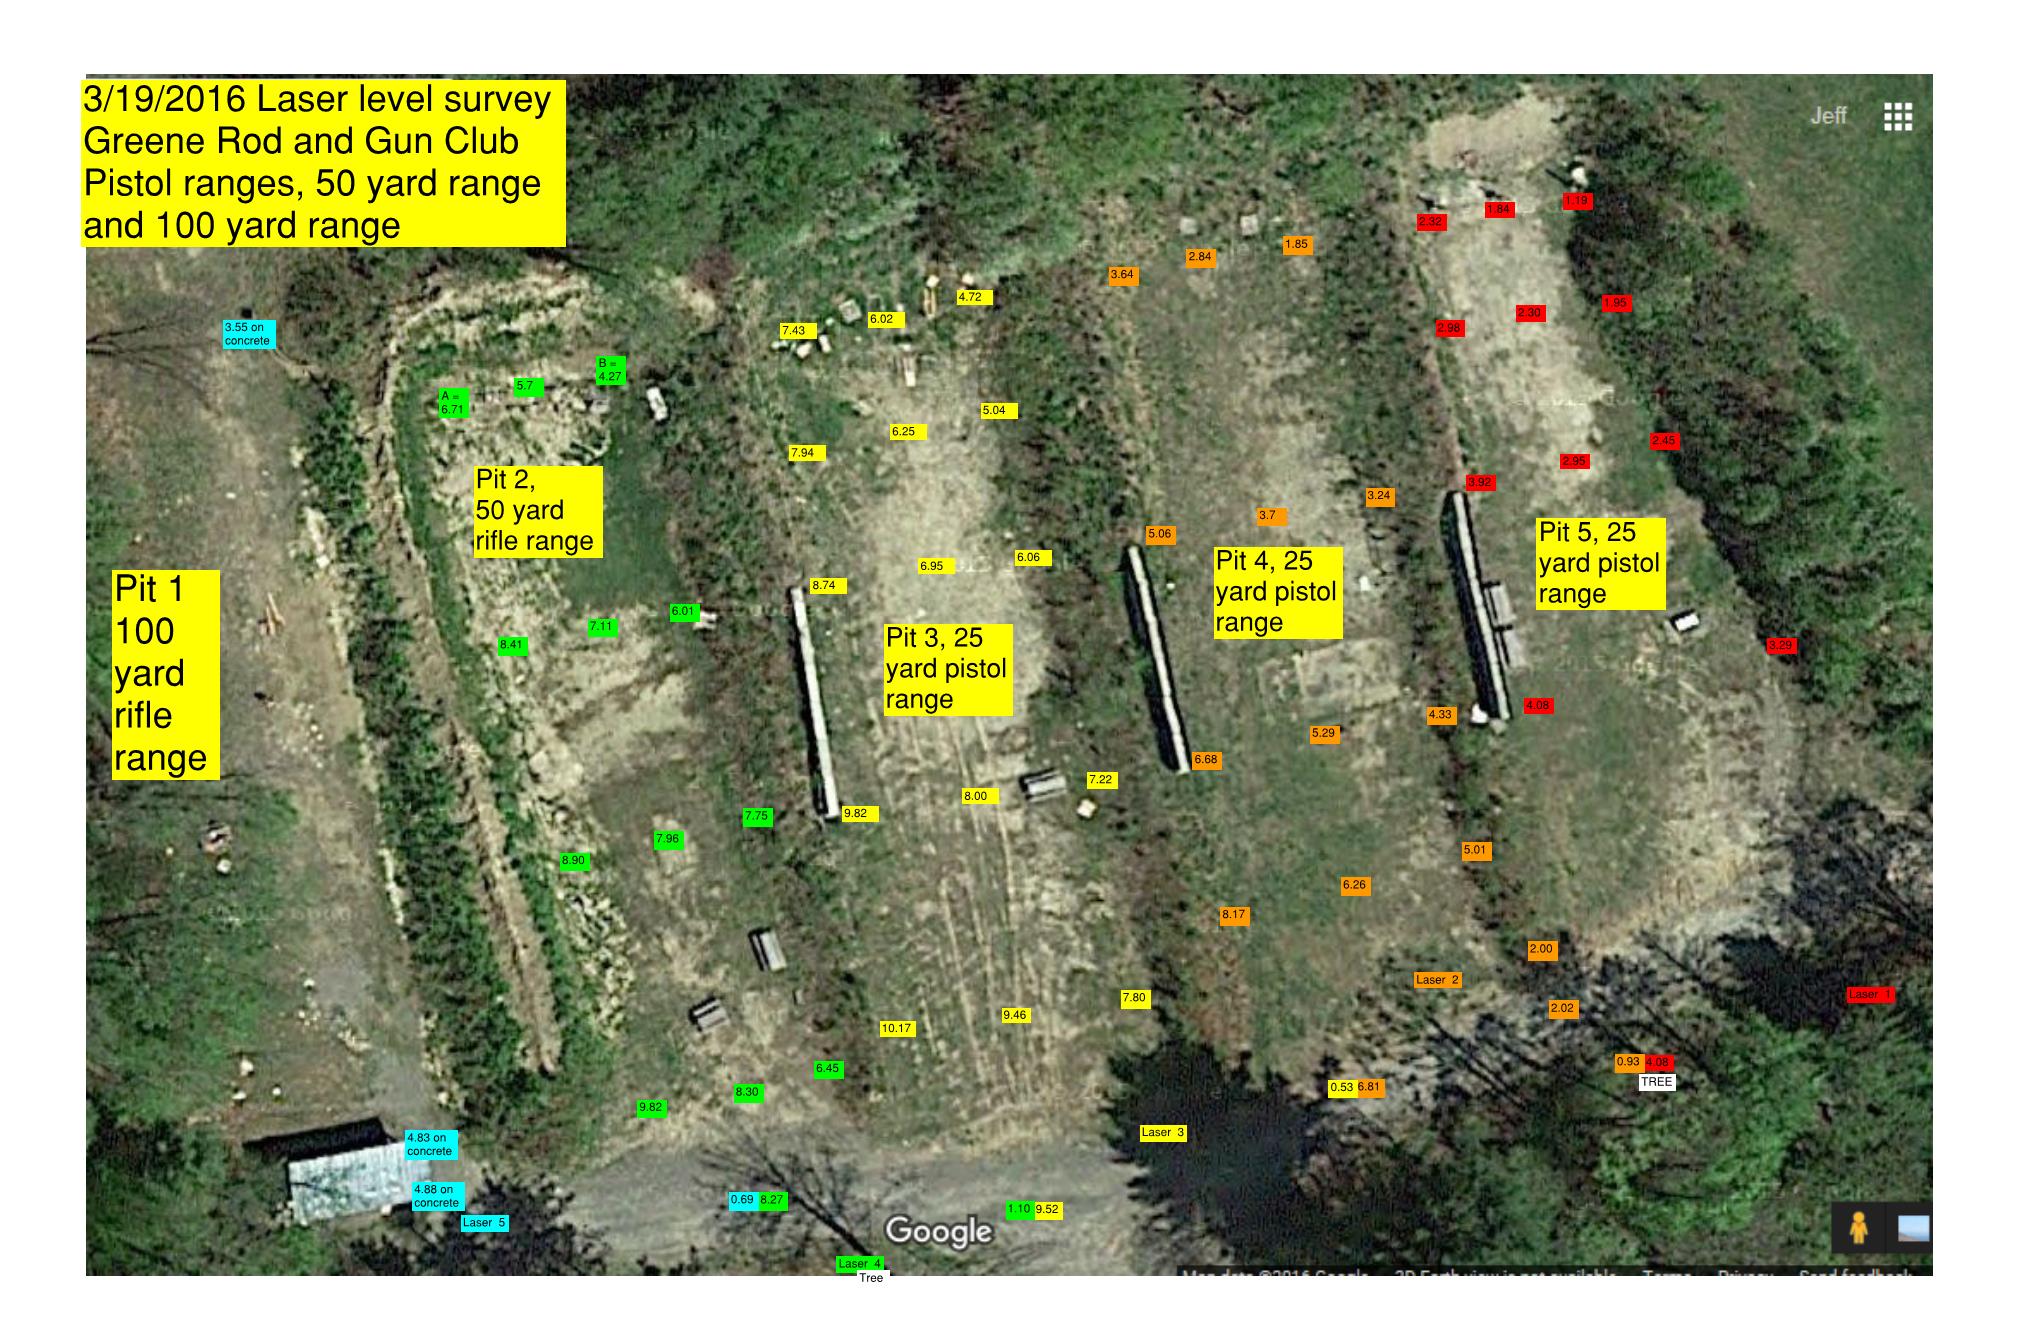
3-19-2016 Laser level measurements, Markup of satellite image
Keep scrolling down for old info…….for reference only….
This project is made possible by a grant from the NRA Foundation, proceeds from IDPA matches and general membership funds from members of the Greene Rod and Gun Club. Please attend and support your Friends of the NRA annual fundraiser banquet. Funds from the banquet go to the NRA foundation and then in turn, the funds are made available for grants such as this.
Those of you who attend our IDPA matches know that our pistol ranges need drainage improvements. The first two IDPA matches in 2015 were cancelled due to muddy conditions.
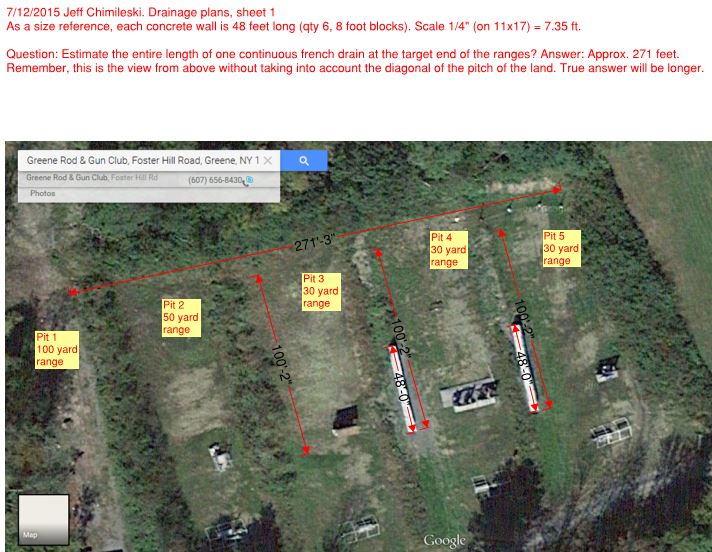
7-12-2015 Jeff Chimileski, satellite view, pistol range drainage plans, sheet 1
Description of project:
Excavate a 25 yard length of each pistol range to reverse the flow of water toward the back berm (toward targets) rather than water flow toward the roadway. The desired pitch toward the back berm is 1 inch drop for each 3 foot run (ie 0.33 inch per foot). Presently, pitch was crudely measured in pit 5 to be 0.21 inch drop per foot toward the road, which is observed to not be enough pitch. The material (dirt) excavated will be used to extend length of the side berms. As dirt is taken away and the “floor” is made “deeper”, the effective result will be a relative increase the height of the back berm without adding material to the back berm.
Excavate for French drain at the downrange (target) end of the ranges. French drain to consist of 3 foot deep by 2 foot wide trench, lined with landscape fabric, one perforated 4 inch diameter flexible storm drain pipe at bottom of trench and second perforated 4 inch diameter storm drain pipe approximately 6 to 12 inches from the top surface. The trench is to be filled with crushed stone and covered with landscape fabric. Crushed stone a few inches thick to be added on top of the fabric. Overall length of French drain is estimated to be at least 270 feet, starting at the right most end of the pit 5 at the top of the hill, to the pit 1 (100 yard range) at the bottom of the hill. A temporary “notch” will need to be excavated from each side berm in order to install French drain. Each side berm to be restored to same height or higher after French drain is installed.
Remove 2′ x 2′ x 6′ and 2′ x 2′ x 3′ concrete blocks from left side of pit 5 to be used as parking barriers and steps. Remove 2′ x 2′ x 8′ and 2′ x 2′ x 4′ concrete blocks from left side of pit 4 to be used as parking barriers and steps. Remove 2′ x 2′ x 8′ and 2′ x 2′ x 4′ concrete blocks from left side of pit 3 to be used elsewhere, perhaps shifted toward the roadway.
Roadway to be widened by 24 feet to create parking areas in front of pit 3, pit4 and pit 5. The parking area will follow the same downhill slope as the present roadway. Middle area between new parking area and the newly excavated 30 yard range will be reserved for future roof structure in each pit. These changes effectively alter the original intent of 50 yard ranges to now be 30 yard ranges. Pit 2 (immediately next to the 100 yard range) will continue to be intended as a 50 yard range.
Material (dirt) produced by excavation to be used to extend the length of side berms (where concrete blocks were located). Additional material (dirt) may need to be trucked in, depending on remaining funds.
Preparations that do not require heavy machinery.
1. Dig one or more test hole(s) at the base of each back berm (target area) to confirm depth of planned excavation is feasible.
2. Calculate volume and estimated cost of crushed stone to be hauled in. 2′ x 3′ x 271′ = 1626 cubic feet of stone. One 16 yard truckload calculates to 432 cubic feet. 4 truck loads (1728 cubic feet) should be enough.
3. Perform additional measurements to estimate volume of excavated material and predict end result of adding to side berms.
4. Purchase landscape fabric.
Landscape fabric, 300 foot roll. 4 rolls would potentially be needed. One for the bottom of the ditch, two for each of the sides of the ditch and one to cover the top of the ditch after filling with stone.
Qty 4 = $248.00
Sta-Green 3-ft x 300-ft Premium Landscape Fabric
Item #: 510594 | Model #: 208537
$62.00
http://www.lowes.com/pd_510594-23132-208537___?productId=50121879&pl=1&Ntt=lanscape+fabric
5. Purchase 4 inch diameter perforated flexible storm drain pipe and connectors.
Tractor Supply has a 250 foot length for a better price per foot vs. Lowes 100 foot rolls. The “perforated” would be the correct pipe, not the “solid”.
http://www.tractorsupply.com/tsc/product/ads-singlewall-perforated-pipe-4-in-x-250-ft
6. Remove the wood from the concrete blocks. (left side of pit 5 and left side of pit 4).
Has anyone out there used a horizontal auger?
http://www.littlebeaver.com/products/mechanical-earth-drills/
A horizontal auger that makes a hole diameter to fit 4″ storm drain pipe could help simplify this job.
Work that requires heavy machinery.
7. Excavate the first 5 to 10 yards of 30 yard length “floor” excavation and trench for French drain at top of hill, pit 5.
8. Excavate notch through the left side berm of pit 5 adjoining pit 4 for French drain.
9. Excavate the first 5 to 10 yards of 30 yard length “floor” excavation and trench for French drain in pit 4.
10. Excavate notch through the left side berm of pit 4 adjoining pit 3 for French drain.
11. Excavate the first 5 to 10 yards of 30 yard length “floor” excavation and trench for French drain in pit 3.
12. Excavate notch through the left side berm of pit 3 adjoining pit 2 for French drain.
13. Excavate the first 5 to 10 yards of 30 yard length “floor” excavation and trench for French drain in pit 2.
14. Excavate notch through the left side berm of pit 2 adjoining pit 1 for French drain (note there are two flex pipes buried here, but were not surrounded by stone or landscape fabric.)
15. Lay down landscape fabric in bottom and sides of trench.
16. Lay down first flex pipe and cover with 12 to 16 inches of stone.
17. Lay down second flex pipe and fill remaining trench with stone.
18. Cover top of trench with landscape fabric and hold down in place with thin layer of stone.
19. Restore side berm between pit 5 and pit 4 by returning dirt to the “notch”.
20. Restore side berm between pit 4 and pit 3 by returning dirt to the “notch”.
21. Restore side berm between pit 3 and pit 2 by retuning dirt to the “notch”.
22. Restore side berm between pit 2 and pit 1 by returning dirt to the “notch”.
23. French drain complete.
24. Move concrete blocks from left side of pit 5 to be used as parking blocks, about 8 or 9 yards from the present roadway. (need more discussion for other uses of the blocks since not all will be needed for parking blocks or stairs between pits. It would be good to only move them once.) We may need to remove the downrange portion of the wall in sections as the dirt becomes available to replace the concrete blocks.
25. Finish the remainder of the 30 yard long “floor excavation” of pit 5 and apply the material where the concrete blocks were removed.
26. Excavate the new parking area in front of pit 5 and apply the dirt to the side berm where the concrete blocks were removed.
8-10-2015: More info here, in addition to the drainage plans shown above. Step 1 is to get the concrete block wall moved down and back from the left side of pit 3 to the right side of pit 2 50 yard range, close to the roadway.
2015 markup 8-10-2015 satellite image, reduced file size